
Tutorials: lighting
Lighting a scene with shadow mapping using WebGL
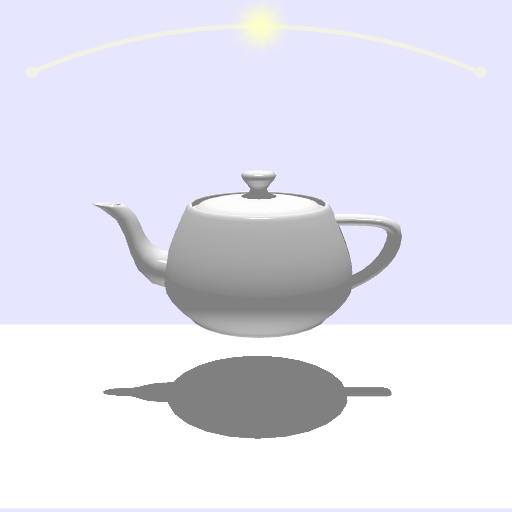
Use the cursor to change the angle of the light source. Use the left click (and hold) to rotate the model. On the left: change color. On the right: choose model.
If you want to test it for yourself, here is the download link with the .zip folder containing the source files. The files contained in this folder are:
- Common (a folder containing WebGL setup files)
- images (a folder containing the images for the user interface)
- Blender_Suzanne.obj (an OBJ file with the monkey face model)
- index.html (the main HTML file, this is where the shaders are written)
- principal.js (the main JavaScript file)
- README.txt (information about the authors)
- render.js (a JavaScript file with the render functions)
- Stanford_bunny.obj (an OBJ file with the bunny model)
- Utah_teapot.obj (an OBJ file with the teapot model)
- verInd.js (a JavaScript file with the vertex and index information of the models)
    Contents:

    - The 3D models
    - Understanding shadow mapping in WebGL
    - Setting it up
    - The main loop
    - The shadowMapRender function
    - The normalRender function
    - The vertex shaders (shadow map)
    - The fragment shaders (shadow map)
    - The vertex shaders (normal render)
    - The fragment shaders (normal render)
The most important parts that make this WebGL example possible are: rendering to the texture that is going to be used as the shadow map, rendering the scene and writing a shader that is going to use the shadow map to create shadows, this shader will also take the normal information of the vertices in the model to achieve diffuse lighting and specular lighting effects.
The 3D models.
The first model, the monkey face model, is a default model that you can find in Blender,
a 3D computer graphics software. The name of the model is Suzanne, you can learn more about it
here.
The second model, the bunny model, is a very famous 3D scan of a ceramic figurine of a
rabbit developed at Stanford University. You can learn more about it
here.
The third model, the teapot model, is also a very famous 3D model,
commonly known as the Utah teapot. Learn more about it
here.
These 3 models are included in the .zip folder that you can download at the
beginning of this page. There are three OBJ files inside of the folder, one
for each model, you can check them out in any software that can open OBJ files.
Understanding shadow mapping in WebGL.
If you want a really good explanation of the concept of shadow mapping please check out this article:
http://www.opengl-tutorial.org/es/intermediate-tutorials/tutorial-16-shadow-mapping/
The information in that article is a good resource that I used myself to understand shadow mapping better.
That article explains
the theory of shadow mapping and explains how to implement it in OpenGL, which is similar
to how it is done in WebGL.
When drawing a shadow map the scene has to be rendered from the point of view of the light source,
in other words, the camera is placed where the light source is and it is aimed at the scene that
you wish to add shadows to.
What we are looking for is how far each point in the scene is from the light. This is represented
by the depth of each fragment, and that is the information that is stored in the shadow map.
To obtain and use this information we render to a texture that is going to store the depth value in each pixel.
In the final render pass we are going to use this texture to make some comparisons.
We compare the depth of the fragments in the current render pass to the depth of the pixels in the texture.
If the current
fragment is farther away form the light than the corresponding pixel (meaning that the depth value
of the fragment is larger than that of the pixel in the texture), that means that the
fragment is covered, or, is in shadow.
In this specific example we are going to use
the WebGL extension named WEBGL_depth_texture. You can learn more about it
here.
Note: As it is an extension, it might not be available in every device. It is possible to
achieve everything shown in this tutorial without using this extension, by using a regular texture
as the frame buffer instead, the difference will be that a regular texture only allows for 8 bit colors,
this means that the only real difference will be that the resolution of the depth information will be lower, but
the process is still the same and it can give similar results if done correctly.
When using this extension we can render to a texture that is going to have only
the depth information of the scene. Below are some examples of how the final render
compares to the shadow map. On the left is the final render and on the right is it´s
corresponding shadow map. This is how it looks when the light source is directly above the models:
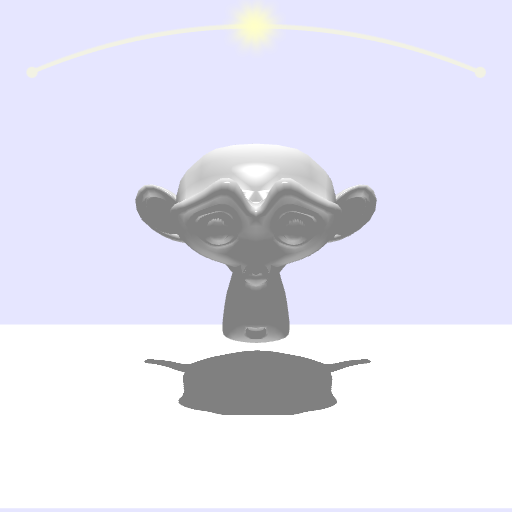
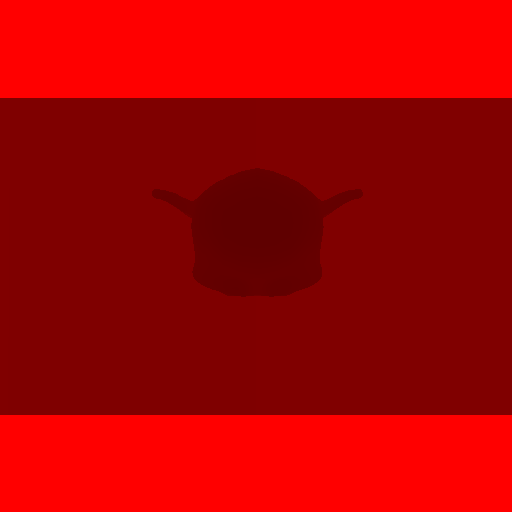
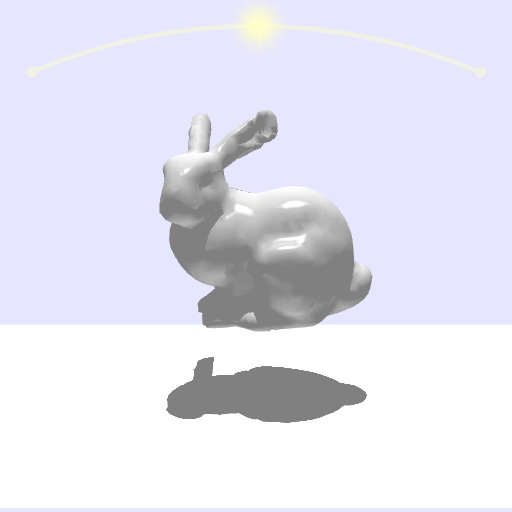
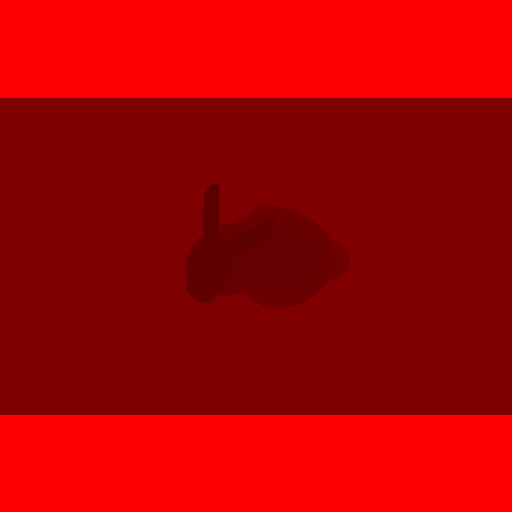
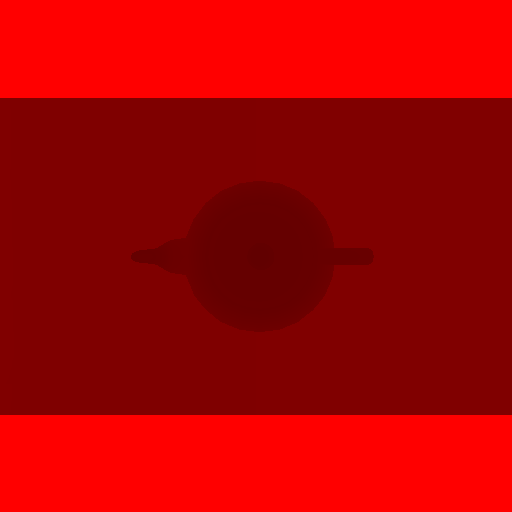
The shadow map is red because when we use WEBGL_depth_texture
the depth information is stored in the red channel of the texture. Pay attention to this in the code.
As you can see, the darker places in the texture are the ones that are closer to the light
source (closer, in this case, means that the depth value is smaller, the smallest value possible
is 0, which would make the pixel look black). That is why you can see the silhouette of the model
in the shadow map. That silhouette is a darker red because the model is always closer to the light than the floor.
Setting it up:
The variable canvas is defined, this will be used to reference the canvas element in which we will render. Also, it is set explicitly that the canvas contents will change constantly, 60 FPS when using requestAnimationFrame.
    canvas = document.getElementById( "gl-canvas" );
    canvas.style.willChange = 'contents';
The variable divCanvas is the container of the canvas, this element has the user interface inside of it.
divCanvas = document.getElementById("divCanvas");
Variables that will tell the position of the mouse relative to the canvas and divCanvas are declared.
    rect = canvas.getBoundingClientRect();
    rectLeft = rect.left;
    rectTop = rect.top;
    rectLeftA = rectLeft;
    rectTopA = rectTop;
    winScrollXA = window.scrollX;
    winScrollYA = window.scrollY;

    rectDivCanvas = divCanvas.getBoundingClientRect();
    rectLeftDivCanvas = rectDivCanvas.left;
    rectTopDivCanvas = rectDivCanvas.top;
    rectLeftADivCanvas = rectLeftDivCanvas;
    rectTopADivCanvas = rectTopDivCanvas;
    winScrollXADivCanvas = window.scrollX;
    winScrollYADivCanvas = window.scrollY;
A variable named gl will be the WebGL context. If the device or browser does not allow the use of WebGL a message is shown. The clear color of the color buffer is set explicitly, this the default background color of the canvas. We enable DEPTH_TEST and CULL_FACE, this done because the models are solid models, this ensures a nice effect when rendering.
    gl = WebGLUtils.setupWebGL(canvas);
    if (!gl) { alert("WebGL isn't available. WebGL no esta disponible"); }

    gl.clearColor( 0.9, 0.9, 1.0, 1.0 );
    gl.enable(gl.DEPTH_TEST);
    gl.enable(gl.CULL_FACE);
A vertex and index buffer are created to store the information of each of the models and the floor.
    bufVMonkey = gl.createBuffer();
    gl.bindBuffer(gl.ARRAY_BUFFER, bufVMonkey);
    gl.bufferData(gl.ARRAY_BUFFER, verMonkey, gl.STATIC_DRAW);
    bufIMonkey = gl.createBuffer();
    gl.bindBuffer(gl.ELEMENT_ARRAY_BUFFER, bufIMonkey);
    gl.bufferData(gl.ELEMENT_ARRAY_BUFFER, indMonkey, gl.STATIC_DRAW);

    bufVBunny = gl.createBuffer();
    gl.bindBuffer(gl.ARRAY_BUFFER, bufVBunny);
    gl.bufferData(gl.ARRAY_BUFFER, verBunny, gl.STATIC_DRAW);
    bufIBunny = gl.createBuffer();
    gl.bindBuffer(gl.ELEMENT_ARRAY_BUFFER, bufIBunny);
    gl.bufferData(gl.ELEMENT_ARRAY_BUFFER, indBunny, gl.STATIC_DRAW);

    bufVTeapot = gl.createBuffer();
    gl.bindBuffer(gl.ARRAY_BUFFER, bufVTeapot);
    gl.bufferData(gl.ARRAY_BUFFER, verTeapot, gl.STATIC_DRAW);
    bufITeapot = gl.createBuffer();
    gl.bindBuffer(gl.ELEMENT_ARRAY_BUFFER, bufITeapot);
    gl.bufferData(gl.ELEMENT_ARRAY_BUFFER, indTeapot, gl.STATIC_DRAW);

    bufVFloor = gl.createBuffer();
    gl.bindBuffer(gl.ARRAY_BUFFER, bufVFloor);
    gl.bufferData(gl.ARRAY_BUFFER, verFloor, gl.STATIC_DRAW);
    bufIFloor = gl.createBuffer();
    gl.bindBuffer(gl.ELEMENT_ARRAY_BUFFER, bufIFloor);
    gl.bufferData(gl.ELEMENT_ARRAY_BUFFER, indFloor, gl.STATIC_DRAW);
These arrays will store the vertex and index information of the 3 models, they will help to switch between the models more easily.
    arrBufVModel = [bufVMonkey, bufVBunny, bufVTeapot];
    arrBufIModel = [bufIMonkey, bufIBunny, bufITeapot];
    arrVerModel = [verMonkey, verBunny, verTeapot];
    arrIndModel = [indMonkey, indBunny, indTeapot];
We need to setup a shader for the model and a shader for the floor. Because we are going to need a shadow map, there is a shader specific for when the shadow map is rendered and another for the final render.
    proModel = initShaders(gl, "progModelVer", "progModelFra");
    proFloor = initShaders(gl, "progFloorVer", "progFloorFra");
    proShadowMapModel = initShaders(gl, "progShadowMapModelVer", "progShadowMapModelFra");
    proShadowMapFloor = initShaders(gl, "progShadowMapFloorVer", "progShadowMapFloorFra");
This is where we get the pointer for the attributes that are going to be used in each shader. It's important to notice that, for the model, we need the “normals” attribute, this attribute will allow us to achieve diffuse and specular lighting on the model.
    vLModel = gl.getAttribLocation(proModel, "vertices");
    gl.enableVertexAttribArray(vLModel);
    nLModel = gl.getAttribLocation(proModel, "normals");

    vLFloor = gl.getAttribLocation(proFloor, "vertices");
    gl.enableVertexAttribArray(vLFloor);

    vLShadowMapModel = gl.getAttribLocation(proShadowMapModel, "vertices");
    gl.enableVertexAttribArray(vLShadowMapModel);

    vLShadowMapFloor = gl.getAttribLocation(proShadowMapFloor, "vertices");
    gl.enableVertexAttribArray(vLShadowMapFloor);
Getting the uniform location of the uniforms that are used in the vertex shaders; “sc” is for scale, “rot” is for rotation and “t” is for translation.
    vUModel0 = gl.getUniformLocation(proModel, "sc");
    vUModel1 = gl.getUniformLocation(proModel, "rot");
    vUModel2 = gl.getUniformLocation(proModel, "t");

    vUFloor0 = gl.getUniformLocation(proFloor, "sc");
    vUFloor1 = gl.getUniformLocation(proFloor, "rot");
    vUFloor2 = gl.getUniformLocation(proFloor, "t");

    vUShadowMapModel0 = gl.getUniformLocation(proShadowMapModel, "sc");
    vUShadowMapModel1 = gl.getUniformLocation(proShadowMapModel, "rot");
    vUShadowMapModel2 = gl.getUniformLocation(proShadowMapModel, "t");

    vUShadowMapFloor0 = gl.getUniformLocation(proShadowMapFloor, "sc");
    vUShadowMapFloor1 = gl.getUniformLocation(proShadowMapFloor, "rot");
    vUShadowMapFloor2 = gl.getUniformLocation(proShadowMapFloor, "t");
Getting the uniform location of the uniforms that are used in the fragment shaders.
    fUModel0 = gl.getUniformLocation(proModel, "anguFoco");
    fUModel1 = gl.getUniformLocation(proModel, "color");
    fUModel2 = gl.getUniformLocation(proModel, "shadowMapOK");

    fUFloor0 = gl.getUniformLocation(proFloor, "shadowMapOK");
We get some more uniform locations for the vertex shaders. These are the matrices that will be used.
    rotMatrixModelL = gl.getUniformLocation(proModel, "rotMatrix");
    perspMatrixModelL = gl.getUniformLocation(proModel, "perspMatrix");
    orthoMatrixModelL = gl.getUniformLocation(proModel, "orthoMatrix");

    rotMatrixShadowMapModelL = gl.getUniformLocation(proShadowMapModel, "rotMatrix");
    orthoMatrixShadowMapModelL = gl.getUniformLocation(proShadowMapModel, "orthoMatrix");

    perspMatrixFloorL = gl.getUniformLocation(proFloor, "perspMatrix");
    orthoMatrixFloorL = gl.getUniformLocation(proFloor, "orthoMatrix");

    orthoMatrixShadowMapFloorL = gl.getUniformLocation(proShadowMapFloor, "orthoMatrix");
The last uniform location we need is for the texture containing the shadow map.
    texShadowMapModelL = gl.getUniformLocation(proModel, "shadowMapTexture");
    texShadowMapFloorL = gl.getUniformLocation(proFloor, "shadowMapTexture");
Adding some event listeners that are going to help with the control of the canvas.
    document.addEventListener("scroll", scrollFunc);

    canvas.addEventListener("mousemove", mouseMoved);
    canvas.addEventListener("mouseup", clickUpCanvas);
    canvas.addEventListener("mousedown", clickDownCanvas);
    canvas.addEventListener("mouseout", mouseOutCanvas);
These event listeners are used by the user interface that allows to change the color of the model.
    divCanvas.addEventListener("mousemove", mouseMovedDivCanvas);

    divCanvas.addEventListener("mouseup", clickUpDivCanvas);
    divCanvas.addEventListener("mousedown", clickDownDivCanvas);
    divCanvas.addEventListener("mouseout", mouseOutDivCanvas);

    red.addEventListener("mousedown", clickDownRed);
    red.addEventListener("mouseup", clickUpRed);

    green.addEventListener("mousedown", clickDownGreen);
    green.addEventListener("mouseup", clickUpGreen);

    blue.addEventListener("mousedown", clickDownBlue);
    blue.addEventListener("mouseup", clickUpBlue);
This section of the code is very important, here is where we setup the things necessary to be able to render the shadow map. First, we start by getting the extension, we need to check out the value of depthTextureExt because if it is null we cannot use this extension, in this case the only thing we can do is alert the user about it. But, if it is successful there are some things that need to be done. A frame buffer is needed and a texture associated with it is also needed. Pay special attention to the parameters of texImage2D. As you can see, we specify that the texture stores the DEPTH_COMPONENT and it is stored in an UNSIGNED_SHORT, meaning 16 bits, this is important because it gives us more resolution to work with, making the shadow map possible.
    depthTextureExt = gl.getExtension('WEBGL_depth_texture');

    if(depthTextureExt !== null){

        shadowMapFramebuffer = gl.createFramebuffer();
        gl.bindFramebuffer(gl.FRAMEBUFFER, shadowMapFramebuffer);

        shadowMapTexture = gl.createTexture();
        gl.bindTexture(gl.TEXTURE_2D, shadowMapTexture);
        gl.texParameteri(gl.TEXTURE_2D, gl.TEXTURE_MIN_FILTER, gl.NEAREST);
        gl.texParameteri(gl.TEXTURE_2D, gl.TEXTURE_MAG_FILTER, gl.NEAREST);
        gl.texParameteri(gl.TEXTURE_2D, gl.TEXTURE_WRAP_S, gl.CLAMP_TO_EDGE);
        gl.texParameteri(gl.TEXTURE_2D, gl.TEXTURE_WRAP_T, gl.CLAMP_TO_EDGE);

        gl.texImage2D(gl.TEXTURE_2D, 0, gl.DEPTH_COMPONENT, 1024, 1024,
                        0, gl.DEPTH_COMPONENT, gl.UNSIGNED_SHORT, null);

        gl.framebufferTexture2D(gl.FRAMEBUFFER, gl.DEPTH_ATTACHMENT,
                                gl.TEXTURE_2D, shadowMapTexture, 0);

        gl.bindTexture(gl.TEXTURE_2D, null);
        gl.bindFramebuffer(gl.FRAMEBUFFER, null);

    }else{
        alertaShadowMap = document.getElementById("alertaShadowMap");
        var alertaSM = "WEBGL_depth_texture is not available, shadows will not be shown."
        alertaShadowMap.innerHTML = alertaSM;
    }
The last thing that we need to do is create both the perspective matrix and the orthographic matrix.
    var fieldOfView = 45.0;
    var nearFrustum = 0.1;
    var farFrustum = 1000.0;
    var fovFactor = nearFrustum * (Math.sin(((fieldOfView / 2) / 180) * Math.PI));

    pMatrix = glFrustum(-fovFactor, fovFactor, -fovFactor, fovFactor,
                        nearFrustum, farFrustum);
    pMatrix0T = [pMatrix[0][0], pMatrix[1][0], pMatrix[2][0], pMatrix[3][0],
                 pMatrix[0][1], pMatrix[1][1], pMatrix[2][1], pMatrix[3][1],
                 pMatrix[0][2], pMatrix[1][2], pMatrix[2][2], pMatrix[3][2],
                 pMatrix[0][3], pMatrix[1][3], pMatrix[2][3], pMatrix[3][3]];

    pMOrtho = glOrtho( - 3.2, 3.2, - 3.2, 3.2, - 10, 10);
    pMatrix0TOrtho = [pMOrtho[0][0], pMOrtho[1][0], pMOrtho[2][0], pMOrtho[3][0],
                      pMOrtho[0][1], pMOrtho[1][1], pMOrtho[2][1], pMOrtho[3][1],
                      pMOrtho[0][2], pMOrtho[1][2], pMOrtho[2][2], pMOrtho[3][2],
                      pMOrtho[0][3], pMOrtho[1][3], pMOrtho[2][3], pMOrtho[3][3]];
The main loop:
This function is called repeatedly to achieve animation. The function rotMatrix updates the matrix that is used to rotate the model when the canvas is clicked. The function updateMatrices is used to calculate the new values of both the perspective matrix and the orthographic matrix. The function sunPositionUpdate is a very simple function that is in charge of changing the position of the indicator of the sun's position when the mouse is moved on the canvas. As you can see, the variable depthTextureExt is checked to see if it's value is not equal to null, if it's not, then the shadowMapRender function is called to render the shadow map. After the shadow map is rendered we can finally render the final scene with the function normalRender.
    function loop() {

        rotMatrix();

        updateMatrices();

        sunPositionUpdate();

        if(depthTextureExt !== null){
            shadowMapRender();
        }

        normalRender();

        requestAnimationFrame(loop);

    }
The shadowMapRender function:
This function starts by binding the shadowMapFramebuffer as the frame buffer, this tells the program that all the subsequent rendering has to be done on this frame buffer. We set the viewport to be 1024X1024 pixels to match the texture's resolution. Because we only need the depth, only the DEPTH_BUFFER_BIT is cleared.
    gl.bindFramebuffer(gl.FRAMEBUFFER, shadowMapFramebuffer);
    gl.viewport( 0, 0, 1024, 1024 );
    gl.clear(gl.DEPTH_BUFFER_BIT);
Setting the program to use proShadowMapModel.
gl.useProgram(proShadowMapModel);
Binding the vertex buffer to use the vertex information of the model, as you can see, we choose from one of the three models from arrBufVModel, the model that is going to be used is determined by the value of the variable model.
    gl.bindBuffer( gl.ARRAY_BUFFER, arrBufVModel[model] );
    gl.vertexAttribPointer( vLShadowMapModel, 3, gl.FLOAT, false, 4*(8), 0 );
Setting the values of the uniforms, the model needs a matrix that rotates it and a matrix used for the orthographic view.
    gl.uniformMatrix3fv( rotMatrixShadowMapModelL, false, rotMatrixAux );
    gl.uniformMatrix4fv( orthoMatrixShadowMapModelL, false, orthoMatrix );

    gl.uniform3fv(vUShadowMapModel0, [1,1,1]);
    gl.uniform3fv(vUShadowMapModel1, [0,0,0]);
    gl.uniform3fv(vUShadowMapModel2, [0.0,1.7,0.0]);
Finally it is rendered, once again, the value of the variable model tells the program which model is used.
    gl.bindBuffer(gl.ELEMENT_ARRAY_BUFFER, arrBufIModel[model]);
    gl.drawElements(4, arrIndModel[model].length, gl.UNSIGNED_SHORT, 0);
Now it's time to render the floor, the program proShadowMapFloor is used in this case.
gl.useProgram(proShadowMapFloor);
Binding the vertex buffer to use the vertex information of the floor.
    gl.bindBuffer( gl.ARRAY_BUFFER, bufVFloor );
    gl.vertexAttribPointer( vLShadowMapFloor, 3, gl.FLOAT, false, 4*(8), 0 );
Setting the values of the uniforms, the floor only needs the matrix used for the orthographic view.
    gl.uniformMatrix4fv( orthoMatrixShadowMapFloorL, false, orthoMatrix );

    gl.uniform3fv(vUShadowMapFloor0, [3.5,2,1]);
    gl.uniform3fv(vUShadowMapFloor1, [-90,0,0]);
    gl.uniform3fv(vUShadowMapFloor2, [0,0,0]);
The last thing that is needed is binding the index buffer and drawing the floor.
    gl.bindBuffer(gl.ELEMENT_ARRAY_BUFFER, bufIFloor);
    gl.drawElements(4, indFloor.length, gl.UNSIGNED_SHORT, 0);
The normalRender function:
We start this function by setting the frame buffer to the default frame buffer, this is done by setting the value to null. Also, the viewport resolution needs to be changed, now we are not rendering to the texture, we are rendering to the canvas so the resolution is set to 512X512 pixels. This time, we need the color buffer as well as the depth buffer, so both are cleared at the start of the rendering.
    gl.bindFramebuffer(gl.FRAMEBUFFER, null);
    gl.viewport( 0, 0, 512, 512 );
    gl.clear(gl.COLOR_BUFFER_BIT | gl.DEPTH_BUFFER_BIT);
Setting the program to use proModel.
gl.useProgram(proModel);
Binding the vertex buffer to use the vertex information of the model, again, the value of the variable model is the one that controls which model should be used. This time we also need an attribute pointer for the normal information of the vertices, this will be used to create diffuse and specular lighting on the model.
    gl.enableVertexAttribArray( nLModel );
    gl.bindBuffer( gl.ARRAY_BUFFER, arrBufVModel[model] );
    gl.vertexAttribPointer( vLModel, 3, gl.FLOAT, false, 4*(8), 0 );
    gl.vertexAttribPointer( nLModel, 3, gl.FLOAT, false, 4*(8), 4*5 );
Setting the values of the uniforms, three matrices are needed, one that describes the rotation of the model, the other two are used to calculate the perspective and orthographic view.
    gl.uniformMatrix3fv( rotMatrixModelL, false, rotMatrixAux );
    gl.uniformMatrix4fv( perspMatrixModelL, false, perspMatrix );
    gl.uniformMatrix4fv( orthoMatrixModelL, false, orthoMatrix );

    gl.uniform3fv(vUModel0, [1,1,1]);
    gl.uniform3fv(vUModel1, [0,0,0]);
    gl.uniform3fv(vUModel2, [0.0,1.7,0.0]);
    gl.uniform1f(fUModel0, mouseX/512);
    gl.uniform3fv(fUModel1, [1-((redY-70)/399), 1-((greenY-70)/399), 1-((blueY-70)/399)]);
This section of the code is where we use the shadow map the was rendered in the shadowMapRender function, depthTextureExt is checked to see if it is not null, is it is null it means that the shadow map was not rendered because the extension is not available, this is done to avoid errors.
    if(depthTextureExt !== null){
        gl.uniform1i(texShadowMapModelL, 0);
        gl.activeTexture(gl.TEXTURE0);
        gl.bindTexture(gl.TEXTURE_2D, shadowMapTexture);
    }

    if(depthTextureExt !== null){
        gl.uniform1f(fUModel2, 1.0);
    }else{
        gl.uniform1f(fUModel2, 0.0);
    }
The last thing that needs to be done for the model is bind the corresponding index buffer and drawing.
    gl.bindBuffer(gl.ELEMENT_ARRAY_BUFFER, arrBufIModel[model]);
    gl.drawElements(4, arrIndModel[model].length, gl.UNSIGNED_SHORT, 0);
This is where we start to render the floor, the program is set to use proFloor.
gl.useProgram(proFloor);
Binding the vertex buffer to use the vertex information of the floor.
    gl.bindBuffer( gl.ARRAY_BUFFER, bufVFloor );
    gl.vertexAttribPointer( vLFloor, 3, gl.FLOAT, false, 4*(8), 0 );
Setting the values of the uniforms, a perspective matrix and an orthographic matrix are used.
    gl.uniformMatrix4fv( perspMatrixFloorL, false, perspMatrix );
    gl.uniformMatrix4fv( orthoMatrixFloorL, false, orthoMatrix );

    gl.uniform3fv(vUFloor0, [3.5,2,1]);
    gl.uniform3fv(vUFloor1, [-90,0,0]);
    gl.uniform3fv(vUFloor2, [0,0,0]);
This is very similar to what happens with the model, we set the texture that has the shadow map information. Again, we make sure that depthTextureExt is not null to avoid errors.
    if(depthTextureExt !== null){
        gl.uniform1i(texShadowMapFloorL, 0);
        gl.activeTexture(gl.TEXTURE0);
        gl.bindTexture(gl.TEXTURE_2D, shadowMapTexture);
    }

    if(depthTextureExt !== null){
        gl.uniform1f(fUFloor0, 1.0);
    }else{
        gl.uniform1f(fUFloor0, 0.0);
    }
And finally we can bind the index buffer and render the floor.
    gl.bindBuffer(gl.ELEMENT_ARRAY_BUFFER, bufIFloor);
    gl.drawElements(4, indFloor.length, gl.UNSIGNED_SHORT, 0);
The vertex shaders (shadow map):
The model's vertex shader: this shader applies some transformations to the vertices.
    attribute vec4 vertices;

    mat4 scalem(float x, float y, float z){
        mat4 scale = mat4( x,  0.0,  0.0, 0.0,
        0.0,  y,  0.0, 0.0,
        0.0,  0.0,  z, 0.0,
        0.0,  0.0,  0.0, 1.0 );
        return scale;
    }
    mat4 translate(float x, float y, float z){
        mat4 trans = mat4( 1.0,  0.0, 0.0, 0.0,
        0.0,  1.0, 0.0, 0.0,
        0.0,  0.0, 1.0, 0.0,
        x,  y, z, 1.0 );
        return trans;
    }

    uniform mat4 orthoMatrix;
    uniform mat3 rotMatrix;

    uniform vec3 sc;
    uniform vec3 rot;
    uniform vec3 t;

    void main()
    {
        vec4 verticesa = vertices;

        mat4 mFinal = translate(t.x, t.y, t.z) * mat4(rotMatrix) * scalem(sc.x, sc.y, sc.z);

        verticesa = mFinal*verticesa;
        verticesa = orthoMatrix*verticesa;

        gl_Position = verticesa;
    }
The floor's vertex shader: similarly to the model's vertex shader, this shader applies some transformations to the vertices.
    attribute vec4 vertices;

    mat4 rotarX(float theta){
        float angulo = radians( theta );
        float c = cos( angulo );
        float s = sin( angulo );
        mat4 rx = mat4( 1.0,  0.0,  0.0, 0.0,
        0.0,  c,  s, 0.0,
        0.0, -s,  c, 0.0,
        0.0,  0.0,  0.0, 1.0 );
        return rx;
    }
    mat4 scalem(float x, float y, float z){
        mat4 scale = mat4( x,  0.0,  0.0, 0.0,
        0.0,  y,  0.0, 0.0,
        0.0,  0.0,  z, 0.0,
        0.0,  0.0,  0.0, 1.0 );
        return scale;
    }
    mat4 translate(float x, float y, float z){
        mat4 trans = mat4( 1.0,  0.0, 0.0, 0.0,
        0.0,  1.0, 0.0, 0.0,
        0.0,  0.0, 1.0, 0.0,
        x,  y, z, 1.0 );
        return trans;
    }

    uniform mat4 orthoMatrix;

    uniform vec3 sc;
    uniform vec3 rot;
    uniform vec3 t;

    void main()
    {
        mat4 mFinal = translate(t.x, t.y, t.z) * rotarX(rot.x) * scalem(sc.x, sc.y, sc.z);

        gl_Position = orthoMatrix * mFinal * vertices;
    }
The fragment shaders (shadow map):
The model's fragment shader: because we are using the WEBGL_depth_texture extension we don't need to do anything inside the fragment shader, the depth value is written to the texture by default.
    precision mediump float;

    void main()
    {

    }
The floor's fragment shader:
    precision mediump float;

    void main()
    {

    }
The vertex shaders (normal render):
The model's vertex shader: in this shader we apply some transformations to the vertices and normals, notice that the value that is sent to gl_Position requires the use of the perspective matrix. There are some varying registers used, through normalsav we send the value of the transformed normals. The varying registers ww and posOrtho are very important to calculate shadows as they are used to make comparisons in the fragment shader.
    attribute vec4 vertices;
    attribute vec3 normals;

    mat4 scalem(float x, float y, float z){
        mat4 scale = mat4( x,  0.0,  0.0, 0.0,
        0.0,  y,  0.0, 0.0,
        0.0,  0.0,  z, 0.0,
        0.0,  0.0,  0.0, 1.0 );
        return scale;
    }
    mat4 translate(float x, float y, float z){
        mat4 trans = mat4( 1.0,  0.0, 0.0, 0.0,
        0.0,  1.0, 0.0, 0.0,
        0.0,  0.0, 1.0, 0.0,
        x,  y, z, 1.0 );
        return trans;
    }

    uniform mat4 perspMatrix;
    uniform mat4 orthoMatrix;
    uniform mat3 rotMatrix;


    uniform vec3 sc;
    uniform vec3 rot;
    uniform vec3 t;

    varying float yv;
    varying vec2 pos;
    varying float norv;
    varying float specv;
    varying vec3 verticesav;
    varying vec3 normalsav;

    varying float ww;
    varying vec4 posOrtho;

    void main()
    {
        vec4 verticesa = vertices;
        vec3 normalsa = normals;

        mat4 mFinal = translate(t.x, t.y, t.z) * mat4(rotMatrix) * scalem(sc.x, sc.y, sc.z);

        normalsa = mat3(mFinal)*normalsa;
        verticesa = mFinal*verticesa;

        verticesav = verticesa.xyz;
        normalsav = normalsa.xyz;

        ww = verticesa.w;

        gl_Position = perspMatrix*verticesa;
        posOrtho = orthoMatrix*verticesa;

    }
The floor's vertex shader: this shader is very similar to the model´s shader, only it is a little simpler, once again the value that gl_Position recieves is the value of the vertices transformed by the perspective matrix. Only the varying register posOrtho is needed here, this is used in the fragment shader to calculate the shadow.
    attribute vec4 vertices;

    mat4 rotarX(float theta){
        float angulo = radians( theta );
        float c = cos( angulo );
        float s = sin( angulo );
        mat4 rx = mat4( 1.0,  0.0,  0.0, 0.0,
        0.0,  c,  s, 0.0,
        0.0, -s,  c, 0.0,
        0.0,  0.0,  0.0, 1.0 );
        return rx;
    }
    mat4 scalem(float x, float y, float z){
        mat4 scale = mat4( x,  0.0,  0.0, 0.0,
        0.0,  y,  0.0, 0.0,
        0.0,  0.0,  z, 0.0,
        0.0,  0.0,  0.0, 1.0 );
        return scale;
    }
    mat4 translate(float x, float y, float z){
        mat4 trans = mat4( 1.0,  0.0, 0.0, 0.0,
        0.0,  1.0, 0.0, 0.0,
        0.0,  0.0, 1.0, 0.0,
        x,  y, z, 1.0 );
        return trans;
    }

    uniform mat4 perspMatrix;
    uniform mat4 orthoMatrix;

    uniform vec3 sc;
    uniform vec3 rot;
    uniform vec3 t;

    varying vec4 posOrtho;

    void main()
    {
        mat4 mFinal = translate(t.x, t.y, t.z) * rotarX(rot.x) * scalem(sc.x, sc.y, sc.z);

        gl_Position = perspMatrix * mFinal * vertices;
        posOrtho = orthoMatrix * mFinal * vertices;
    }
The fragment shaders (normal render):
The model's fragment shader: first we need some calculations that are going to be needed to create the specular lighting effect and the diffuse lighting effect.
    //the light source
    vec3 source = vec3(10000.0*cos(radians(135.0 - 90.0*anguSource)),
                     10000.0*sin(radians(135.0 - 90.0*anguSource)),
                     0.0);
    vec3 sourceD = vec3(source.x-verticesav.x, source.y-verticesav.y, source.z-verticesav.z);
    vec3 sourceN = normalize(sourceD);
    float sourceDot = dot(normalsav.xyz, sourceN.xyz);
    float sourceAngu = acos(sourceDot);

    //the eye
    vec3 eye = vec3(0.0, 0.0, 10000.0);
    vec3 eyeD = vec3(eye.x-verticesav.x, eye.y-verticesav.y, eye.z-verticesav.z);
    vec3 eyeN = normalize(eyeD);
    float eyeDot = dot(normalsav.xyz, eyeN.xyz);
    float eyeAngu = acos(eyeDot);

    //light that bounces from the floor
    vec3 bounce = vec3(0.0, -10.0, 10.0);
    vec3 bounceD = vec3(bounce.x-verticesav.x, bounce.y-verticesav.y, bounce.z-verticesav.z);
    vec3 bounceN = normalize(bounceD);
    float bounceDot = dot(normalsav.xyz, bounceN.xyz);
This is where the specular component of the lighting is calculated, as you see this is a result of the relationship between the angle of incidence of the light and where the eye is positioned, since this is done per fragment the resulting effect is very soft.
    //specular component calculations
    vec3 sourceXEye = cross(sourceN.xyz, eyeN.xyz);
    float sourceEyeDot = dot(normalsav.xyz, sourceXEye.xyz);
    float sourceEyeAngu = acos(sourceEyeDot);

    float difAngu = sourceAngu-eyeAngu;
    float difFOAngu = (3.1416/2.0)-sourceEyeAngu;

    float dista = sqrt(difAngu*difAngu + difFOAngu*difFOAngu);

    float specularComp = 0.0;
    float anguFact = 0.218165;

    if(dista<=anguFact){
        specularComp = min(2.0*((anguFact-dista)/anguFact), 1.0);
    }
Here, the shadow is calculated. Something that is important to notice is that these calculations only happen is shadowMapOK is equal to 1, if is not equal to one it indicates that the depth texture extension is not available, so the shadow map was not rendered, this is done to avoid errors. The shadow map is sampled and compared 4 times and then those values are mixed together, this ensures that the edges of the shadow are softer, giving a nicer effect.
    //shadow calculations
    float shadow = 1.0;
    if(shadowMapOK == 1.0){
        if(sourceDot>0.1){

            vec3 projCoords = posOrtho.xyz/posOrtho.w;
            projCoords = projCoords * 0.5 + 0.5;
            float depth = projCoords.z  - (4.0/1024.0);

            vec2 texelSize = vec2(1.0/1024.0, 1.0/1024.0);
            vec2 pixelPos = projCoords.xy/texelSize + vec2(0.5);
            vec2 fracPart = fract(pixelPos);
            vec2 startTexel = (pixelPos - fracPart) * texelSize;

            float shadowDepth1 = texture2D(shadowMapTexture, startTexel).r;
            float blTexel = step(depth, shadowDepth1);

            float shadowDepth2 = texture2D(shadowMapTexture,
                                           startTexel+vec2(texelSize.x, 0.0)).r;
            float brTexel = step(depth, shadowDepth2);

            float shadowDepth3 = texture2D(shadowMapTexture,
                                           startTexel+vec2(0.0, texelSize.y)).r;
            float tlTexel = step(depth, shadowDepth3);

            float shadowDepth4 = texture2D(shadowMapTexture, startTexel+texelSize).r;
            float trTexel = step(depth, shadowDepth4);

            float mixA = mix(blTexel, tlTexel, fracPart.y);
            float mixB = mix(brTexel, trTexel, fracPart.y);

            shadow = mix(mixA, mixB, fracPart.x);

        }
    }
In this section of the code the diffuse color is obtained, as you can see, the diffuse component is not only a result of the main light source, but we take into account that some light bounces from the floor into the model. This gives a more realistic effect because in the real world light bounces from one object to another, so, it is logical that some light would bounce on the floor, illuminating the model.
    //diffuse component calculations
    float diffuseSource = max(sourceDot, 0.1);
    diffuseSource = diffuseSource/0.1;
    diffuseSource = (1.0 - shadow) + (shadow * diffuseSource);

    float diffuseBounce = max(bounceDot, 0.7);
    diffuseBounce = diffuseBounce/0.7;

    float factDiffuse = min( ( 0.5*((diffuseSource - 1.0)/9.0) + 0.5) * diffuseBounce, 1.0 );

    vec3 diffuseColor = vec3(color.r*factDiffuse, color.g*factDiffuse, color.b*factDiffuse);
And finally, we can get the resulting color of the model, taking into account the contribution of the diffuse and specular lighting, and the shadow.
    //final color
    gl_FragColor = vec4(diffuseColor.r + (1.0-diffuseColor.r)*specularComp*shadow,
                        diffuseColor.g + (1.0-diffuseColor.g)*specularComp*shadow,
                        diffuseColor.b + (1.0-diffuseColor.b)*specularComp*shadow, 1.0);
The floor's fragment shader: the only thing that is needed in this shader is to calculate the shadow that is going to be projected on the floor. The process is very similar to what was done in the model's fragment shader.
    vec3 projCoords = posOrtho.xyz/posOrtho.w;
    projCoords = projCoords * 0.5 + 0.5;
    float depth = projCoords.z;

    vec2 texelSize = vec2(1.0/1024.0, 1.0/1024.0);
    vec2 pixelPos = projCoords.xy/texelSize + vec2(0.5);
    vec2 fracPart = fract(pixelPos);
    vec2 startTexel = (pixelPos - fracPart) * texelSize;

    float shadow = 1.0;
    if(shadowMapOK == 1.0){
        float shadowDepth1 = texture2D(shadowMapTexture, startTexel).r;
        float blTexel = step(depth-0.0025, shadowDepth1);

        float shadowDepth2 = texture2D(shadowMapTexture,
                                       startTexel + vec2(texelSize.x, 0.0)).r;
        float brTexel = step(depth-0.0025, shadowDepth2);

        float shadowDepth3 = texture2D(shadowMapTexture,
                                       startTexel + vec2(0.0, texelSize.y)).r;
        float tlTexel = step(depth-0.0025, shadowDepth3);

        float shadowDepth4 = texture2D(shadowMapTexture, startTexel + texelSize).r;
        float trTexel = step(depth-0.0025, shadowDepth4);

        float mixA = mix(blTexel, tlTexel, fracPart.y);
        float mixB = mix(brTexel, trTexel, fracPart.y);

        shadow = mix(mixA, mixB, fracPart.x);
    }

    gl_FragColor = vec4(0.5+0.5*shadow, 0.5+0.5*shadow, 0.5+0.5*shadow, 1.0);
That is all the important details that make this experiment work. I hope this example
gave you some tools to add lighting to any scene. Also, I hope that this example gives
you a better understanding of how to use WebGL in general.
Make sure to test it for yourself using the download link for the source files provided
at the beginning of this page. I invite you to change some values in the code to see
what happens, you can try to change the resolution of the shadow map to see how this
changes the quality of the resulting shadow, or maybe something a little more technically
challenging like changing the intensity or color of the light source.
Remember, everything in this
tutorial can be achieved by using a regular texture instead of the "depth texture" extension. I
encourage you to modify this tutorial so it uses a regular texture to store the depth information,
doing so will inprove compatibility, as some devices cannot use this extension.
Keep experimenting and thanks for reading.
⇣ More content ⇣
Games:
Tanque 3D: Sports
◾ Play Tanque 3D: SportsTanque 3D: Tank Battle
◾ Play Tanque 3D: Tank BattleRobotic Sports: Tennis
◾ Play Robotic Sports: TennisTutorials: