
Tutorials: vertex manipulation
Creating a simple liquid effect on a mesh using WebGL
Use the left click to create a ripple. Use the right click (and hold) to move the camera.
If you want to test it for yourself, here is the download link with the .zip folder containing the source files. The files contained in this folder are:
- Common (a folder containing WebGL setup files)
- backGLiquid.png (the texture of the mesh)
- index.html (the main HTML file, here is where the shaders are written)
- meshSimple.obj (an OBJ file with the mesh that is used)
- principal.js (the main JavaScript file)
- README.txt (information about the authors)
    Contents:

    - Understanding the mesh
    - Setting it up
    - Vector rotation functions
    - The main loop
    - The rotCameraUpdate function
    - The projectedPointer function
    - The render function
    - The vertex shader
    - The fragment shader
The most important parts that make this WebGL example possible are: a mesh that has enough vertices to make this effect visible and a vertex shader that will be in charge of modifying both the Y coordinate and the color of the vertices.
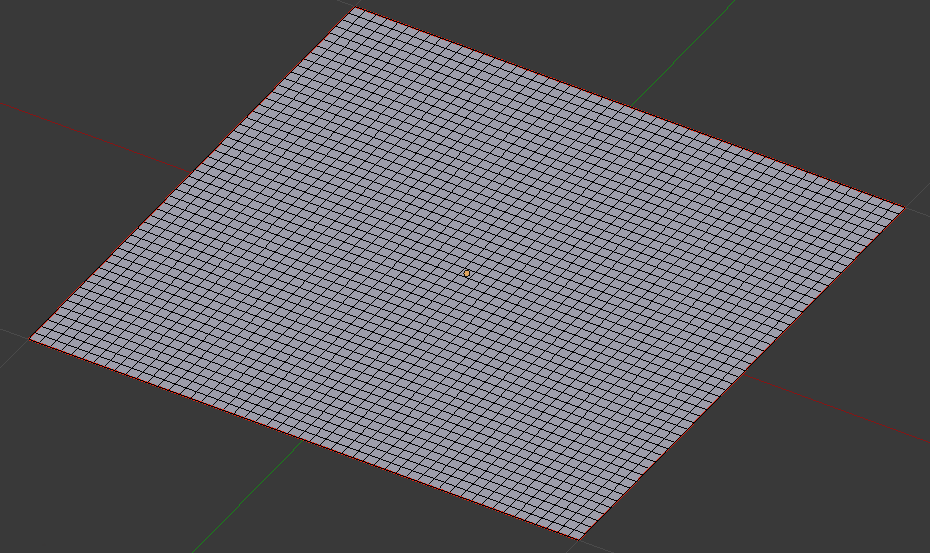
Understanding the mesh.
You can check it out directly by downloading the files, the file named meshSimple.obj is the one
that has the information of the mesh. You can open this file in any software that can read OBJ files.
This mesh is a square made out of many smaller squares, the more squares you have the better the
effect looks but it requires more power from the processor, on the other hand, if you have less
squares the performance requirement goes down but it doesn´t look as good. At the end of the day
it comes down to the amount of vertices, since, in this example, they are the ones being modified
every time a frame is rendered.
Setting it up:
A global variable named canvas is defined, this will be used to reference the canvas element in which we will render. Also, it is set explicitly that the canvas contents will change constantly, 60 FPS ideally, because requestAnimationFrame is used.
    canvas = document.getElementById( "gl-canvas" );
    canvas.style.willChange = 'contents';
Variables that will tell the position of the mouse relative to the canvas are declared.
    rect = canvas.getBoundingClientRect();
    rectLeft = rect.left - window.scrollX;
    rectTop = rect.top + window.scrollY;
    rectLeftA = rectLeft;
    rectTopA = rectTop;
A variable named gl will be the WebGL context. A HTML Canvas element is used, if the browser does not allow the use of WebGL a message is shown. The WebGL viewport is set to the same size as the Canvas. The clear color of the color buffer is set explicitly, this the default background color of the canvas. Also, we need to enable depth testing to ensure a nice effect.
    gl = WebGLUtils.setupWebGL( canvas );
    if ( !gl ) { alert( "WebGL isn't available. WebGL no esta disponible" ); }

    gl.viewport( 0, 0, canvas.width, canvas.height );
    gl.clearColor( 0.95, 0.95, 0.95, 1.0 );
    gl.enable(gl.DEPTH_TEST);
A vertex and index buffer are created and loaded with the information contained in verMeshSimple and indMeshSimple.
    bufVMeshSimple = gl.createBuffer();
    gl.bindBuffer( gl.ARRAY_BUFFER, bufVMeshSimple );
    gl.bufferData( gl.ARRAY_BUFFER,verMeshSimple, gl.STATIC_DRAW );

    bufIMeshSimple = gl.createBuffer();
    gl.bindBuffer( gl.ELEMENT_ARRAY_BUFFER, bufIMeshSimple );
    gl.bufferData(gl.ELEMENT_ARRAY_BUFFER,indMeshSimple, gl.STATIC_DRAW);
Setting up the vertex shader and fragment shader to be used.
proMeshSimple = initShaders( gl, "progMeshSimpleVer", "progMeshSimpleFra" );
Getting the vertex attribute location for the attributes “vertices” and “uvs” used in the shader.
    vLMeshSimple = gl.getAttribLocation( proMeshSimple, "vertices" );
    gl.enableVertexAttribArray( vLMeshSimple );
    cLMeshSimple = gl.getAttribLocation( proMeshSimple, "uvs" );
    gl.enableVertexAttribArray( cLMeshSimple );
Getting the uniform location of the uniforms that are used in the shaders. There are 7 uniforms used in the vertex shader, one of those is the matrix that is going to allow to have a perspective view when rendering. In the fragment shader there are only 2 uniforms used, one of those is the texture of the mesh.
    vUMeshSimple0 = gl.getUniformLocation( proMeshSimple, "sc" );
    vUMeshSimple1 = gl.getUniformLocation( proMeshSimple, "t" );
    vUMeshSimple2 = gl.getUniformLocation( proMeshSimple, "p" );
    vUMeshSimple3 = gl.getUniformLocation( proMeshSimple, "time" );
    vUMeshSimple4 = gl.getUniformLocation( proMeshSimple, "timeA" );
    vUMeshSimple5 = gl.getUniformLocation( proMeshSimple, "propa" );
    mCommonMeshSimpleL = gl.getUniformLocation( proMeshSimple, "mvpMat" );

    fUMeshSimple0 = gl.getUniformLocation( proMeshSimple, "point" );
    texMeshSimpleL = gl.getUniformLocation( proMeshSimple, "texture" );
We need to load the image that is going to be used as the texture on the mesh.
    images[0].src = imaDisp[0];
    images[0].onload = function() { configureTexture( images[0],0);};
The function named configureTexture creates the WebGL texture element that is going to be referenced later, the image has RGBA information. Mipmaping is used to filter the texture, this improves the way the texture looks when viewed from different angles. Also, a variable named loader counts up every time the image is loaded, this variable will be used to know if the image is loaded correctly before rendering.
    function configureTexture(image, index) {

        textures[index] = gl.createTexture();
        gl.bindTexture( gl.TEXTURE_2D, textures[index] );
        gl.pixelStorei(gl.UNPACK_FLIP_Y_WEBGL, true);

        gl.texImage2D( gl.TEXTURE_2D, 0, gl.RGBA, gl.RGBA, gl.UNSIGNED_BYTE, image );

        gl.generateMipmap( gl.TEXTURE_2D );
        gl.texParameteri( gl.TEXTURE_2D, gl.TEXTURE_MIN_FILTER,  gl.LINEAR_MIPMAP_LINEAR);
        gl.texParameteri( gl.TEXTURE_2D, gl.TEXTURE_MAG_FILTER, gl.LINEAR );

        loader++;
    }
Some event listeners are set. The function scrollFunc is used to update the position of the cursor when the page is scrolled. The function mouseMoved updates the positon of the cursor when it is moved inside the Canvas. Both clickUpCanvas and clickDownCanvas are used to check clicks inside the Canvas.
    document.addEventListener("scroll", scrollFunc);

    canvas.addEventListener("mousemove", mouseMoved);
    canvas.addEventListener("mouseup", clickUpCanvas);
    canvas.addEventListener("mousedown", clickDownCanvas);
What is happening inside the function scrollFunc is that the variables rectLeft and rectTop are updated using the current window.scrollX and window.scrollY values of the window.
    function scrollFunc(event){
        rectLeft = rectLeftA - window.scrollX;
        rectTop = rectTopA - window.scrollY;
    }
The function mouseMoved is a short function that updates the values of two global variables, mouseX and mouseY, these variables are very important as they are used to know where is the ripple going to start from.
    function mouseMoved(event){
        mouseX = event.clientX  - rectLeft;
        mouseY = event.clientY  - rectTop;
    }
The last thing that needs to be setup is a perspective matrix, this is going to be used to calculate the MVP matrix. The near and far clipping plane, the field of view and the aspect ratio are defined to calculate this matrix.
    var near = 0.1;
    var far = 1000;
    var  fovy = 45.0;
    var  aspect = 700 / 512;
    pMatrix = perspective(fovy, aspect, near, far);

    pMatrix0T = [pMatrix[0][0], pMatrix[1][0], pMatrix[2][0], pMatrix[3][0],
                 pMatrix[0][1], pMatrix[1][1], pMatrix[2][1], pMatrix[3][1],
                 pMatrix[0][2], pMatrix[1][2], pMatrix[2][2], pMatrix[3][2],
                 pMatrix[0][3], pMatrix[1][3], pMatrix[2][3], pMatrix[3][3]];
Vector rotation functions.
The functions rotateX and rotateY are used repeatedly throughout the code to rotate a specific vector, rotateX rotates the vector with respect to the X axis and rotateY with respect to the Y axis. These functions receive the vector and the angle of rotation and return the rotated vector.
    function rotateX(x, y, z, theta, math) {

        theta = theta * 0.0174533;
        var c = math.cos(theta);
        var s = math.sin(theta);

        return [x, y*c + z*s, -y*s + z*c];

    }

    function rotateY(x, y, z, theta, math){

        theta = -theta * 0.0174533;
        var c = math.cos(theta);
        var s = math.sin(theta);

        return [x*c - z*s, y, x*s + z*c];

    }
The main loop:
This function is called repeatedly to achieve animation. The global variable time increases by one every time loop is called, this variable is used as a timer. The function rotCameraUpdate is used to modify the viewing angle of the camera when a user presses the right click and drags the cursor on the canvas. The function projectedPointer calculates the position of the cursor in 3D space based on it´s position in 2D space. The function mvpMatrixUpdate calculates the MVP matrix for the current frame. If the variable loader is equal to 1, meaning that the texture was loaded correctly, the rendering function is called.
    function loop() {

        time++;

        rotCameraUpdate();

        projectedPointer();

        mvpMatrixUpdate();

        if(loader===1){
            render();
        }

        requestAnimationFrame(loop);

    }
The rotCameraUpdate function:
This function updates both rotCameraX and rotCameraY. For these values to change the value of clickRight most be equal to true, that means the mouse right click is pressed.
    function rotCameraUpdate(){
        if(clickRight){
            rotCameraX = rotCameraXAD+0.5*(mouseY-mouseYA);
            rotCameraY = rotCameraYAD-0.5*(mouseX-mouseXA);
            if(rotCameraX>89){
               rotCameraX=89;
            }
            if(rotCameraX<10){
               rotCameraX=10;
            }
        }
    }
The projectedPointer function:
This function has a very important job which is translating the position of the cursor from a 2D space (given by mouseX and mouseY) and translating it to the projected equivalent in 3D space, those values are stored in the variables posPointerX and posPointerZ, both variables are used in later parts of the code.
    function projectedPointer(){

        var degToRad = Math.PI / 180;

        var posMouseX = ((mouseX - 350)/350) * eyeToCenter;
        var posMouseY = ((mouseY - 256)/256) * eyeToCenter / (700 / 512);

        var anguloPorAhora = Math.atan2(posMouseX , cameraToCenter);
        var thetazp = Math.atan2(posMouseY , cameraToCenter);
        var thetaz = -rotCameraX * degToRad;
        var zzz = ((Math.tan(thetazp) * cameraToCenter) /
                   (Math.tan(thetaz) - Math.tan(thetazp)));

        posPointerX = posMouseX + (zzz * Math.tan(anguloPorAhora));
        posPointerZ = -zzz / Math.cos(thetaz);

        var ammm = Math.sqrt(at[0]*at[0] + at[2]*at[2]);

        var rotCamYGrad = rotCameraY * degToRad;
        var c = Math.cos(rotCamYGrad);
        var s = Math.sin(rotCamYGrad);
        var vPunt = rotateY(posPointerX + at[0]*c - at[2]*s,
                            0,
                            posPointerZ + at[0]*s + at[2]*c,
                            rotCameraY, Math);

        posPointerX = vPunt[0];
        posPointerZ = vPunt[2];

    }
The render function:
In this function we do everything that is related to the WebGL context. To start the rendering, the color buffer and depth buffer are cleared.
gl.clear(gl.COLOR_BUFFER_BIT | gl.DEPTH_BUFFER_BIT);
Setting the program to use proMeshSimple.
gl.useProgram(proMeshSimple);
We bind the vertex buffer to then set the attribute pointers that are going to be used in this render pass, the pointers correspond to “vertices” and “uvs”, these are used in the vertex shader.
    gl.bindBuffer( gl.ARRAY_BUFFER, bufVMeshSimple );
    gl.vertexAttribPointer( vLMeshSimple, 3, 5126, false, 4*(8), 0 );
    gl.vertexAttribPointer( cLMeshSimple, 2, 5126, false, 4*(8), 4*3 );
A matrix uniform is set, this matrix will be used in the vertex shader to create perspective for the scene.
gl.uniformMatrix4fv( mCommonMeshSimpleL, false, mvpMatrix );
Configuring the texture.
    gl.uniform1i(texMeshSimpleL, 0);
    gl.activeTexture(gl.TEXTURE0);
    gl.bindTexture(gl.TEXTURE_2D, textures[0]);
Only 15 ripples can be created at once, the for loop counts to that number. The variables timeA0, timeA and propa are arrays of length 15 that contain information specific to each ripple. The variable timeA0 is used to add an offset to the sinusoid used in the vertex shader. The variable timeA is used as a timer and as the limit of the ripple, when timeA reaches 1000 the ripple stops completely. That is the amount of frames that the ripple exists for, so, 1000 frames at 60 frames per second means that a ripple is rendered for 16.67 seconds. The value of propa is the limiting radius of each ripple, it becomes larger as time passes to create the effect of propagation from a center point.
    for (var i = 0; i < 15; i++) {
        if(timeA[i]<1000){
            timeA0[i] += 0.31416;
            timeA[i] += 0.1+(timeA[i]/250);
            propa[i] += 0.01818;
        }
    }
Setting the uniforms that are going to be used in the vertex shader.
    gl.uniform3fv(vUMeshSimple0, [1,1,1]);

    gl.uniform3fv(vUMeshSimple1, [0,0,0]);

    gl.uniform2fv(vUMeshSimple2, posLi);

    gl.uniform1fv(vUMeshSimple3, timeA0);

    gl.uniform1fv(vUMeshSimple4, timeA);

    gl.uniform1fv(vUMeshSimple5, propa);
Setting the uniform the is used in the fragment shader.
gl.uniform2fv(fUMeshSimple0, [posPointerX, posPointerZ]);
The last thing that is needed is binding the index buffer and drawing the scene.
    gl.bindBuffer(gl.ELEMENT_ARRAY_BUFFER, bufIMeshSimple);

    gl.drawElements(4, indMeshSimple.length, gl.UNSIGNED_SHORT, 0);
The vertex shader:
There are some things to do before beginning the main function in the vertex shader. First, the vertex position and texture sampler attributes are read to vertices and uvs, respectively. The matrix mvpMat is used for perspective in the scene. Some other uniforms are needed, sc is the scale, and t is the translation of our mesh, in this example they are really not used for much. The variable p is an array of vec2 because it has the X and Z values of the center of the ripple. The varying register called uvsv is simply used to pass the interpolated texture sample information to the fragment shader. The variable yv is used to modify the color in the fragment shader and pos is used to know the interpolated position of the vertices in the fragment shader.
    attribute vec4 vertices;
    attribute vec2 uvs;

    uniform mat4 mvpMat;

    uniform vec3 sc;
    uniform vec3 t;
    uniform vec2 p[15];
    uniform float timeA0[15];
    uniform float timeA[15];
    uniform float propa[15];

    varying vec2 uvsv;
    varying float yv;
    varying vec2 pos;
The first thing done in the main function is passing the value of vertices to verticesa, verticesa is the one that is going to be modified. The variable dista stores the distance between the center of the ripple and each of the vertices. The variable fact is very important as is the variable used to know how much the y coordinate of each vertex needs to be modified. The value of each ripple is added to create the final value of verticesa.y.
    vec4 verticesa = vertices;
    float dista;
    float fact = 0.0;
    for(int i =0; i<15; i++){
        if(timeA[i]<1000.0){
            dista = distance(p[i].xy, verticesa.xz);
            if(dista<propa[i]){

                fact = 0.3*(dista/timeA[i])*cos(11.0*(3.1416/2.0)*dista - timeA0[i]);

                verticesa.y += fact;

            }
        }
    }
Here we send the interpolated position of the vertices on the XZ plane, this is done with the varying register pos. The value of yv will be used to modify the color of the vertices with respect to their Y coordinate.
    pos = verticesa.xz;
    yv = verticesa.y*3.0;
These two are simply a scaling matrix and a translation matrix.
    mat4 scale = mat4( sc.x,  0.0,  0.0, 0.0,
                       0.0,  sc.y,  0.0, 0.0,
                       0.0,  0.0,  sc.z, 0.0,
                       0.0,  0.0,  0.0, 1.0 );

    mat4 trans = mat4( 1.0,  0.0, 0.0, 0.0,
                       0.0,  1.0, 0.0, 0.0,
                       0.0,  0.0, 1.0, 0.0,
                       t.x,  t.y, t.z, 1.0 );
The last thing that needs to be done is obtaining the final position of the vertices, some matrix multiplications are done to obtain this value. The last multiplication with mvpMat gives the perspective effect. After this, the value can be sent to gl_Position. Also, the interpolated value of uvs is sent to the fragment shader through uvsv.
    mat4 mFinal = trans*scale;
    verticesa = mFinal*verticesa;

    gl_Position = mvpMat*verticesa;
    uvsv = uvs;
The fragment shader:
Nothing too complicated happens in the fragment shader. It receives the texture and the interpolated uvsv to calculate the final color, this color is then modified by the value of yv, this is to give more emphasis to the ripples, if a vertex is higher, meaning that it´s Y coordinate is larger, the color is lighter, if the vertex is lower it becomes darker. The uniform point gives us the position of the cursor on the XZ plane, it is used to render a circle on top of the mesh to make it easier to know where the center of the ripple is. After all this, the final color is passed to gl_FragColor.
    precision mediump float;
    varying vec2 uvsv;
    uniform sampler2D texture;

    varying float yv;
    varying vec2 pos;
    uniform vec2 point;

    void main()
    {
        vec4 color = texture2D( texture, uvsv );
        color.xyz += yv;

        float distoA = distance(point.xy, pos.xy);
        if(distoA<0.05){
            color.xyz += (0.05-distoA)/0.05;
        }

        gl_FragColor = color;
    }
That is all the important details that make this experiment work. I hope you now know
how to create this type of effect that takes advantage of the vertex shader. Also, I hope
that this example gives you a better understanding of how to use WebGL in general.
Make sure to test it for yourself using the download link for the source files provided at
the beginning. I invite you to change some values in the code to see what happens, try
substituting the texture with one of your own, try to make the speed of propagation
of the ripples faster or try to make the ripples go higher by changing the factor that
modifies the Y coordinate of the vertices.
Keep experimenting and thanks for reading.
⇣ More content ⇣
Games:
Tanque 3D: Sports
◾ Play Tanque 3D: SportsTanque 3D: Tank Battle
◾ Play Tanque 3D: Tank BattleRobotic Sports: Tennis
◾ Play Robotic Sports: TennisTutorials: